> ## Documentation Index
> Fetch the complete documentation index at: https://docs.convocore.app/llms.txt
> Use this file to discover all available pages before exploring further.
# Quick Start Guide
> Get your SIP trunk connected in 5 minutes
# SIP Trunking Quick Start
This guide will walk you through setting up your first SIP trunk and connecting it to a Convocore AI agent in just a few steps.
## Prerequisites
Before you begin, make sure you have:
* ✅ A Convocore account with an active workspace
* ✅ A SIP trunk provider account (e.g., Twilio or Peoplefone)
* ✅ At least one phone number from your SIP provider
* ✅ A voice-enabled AI agent configured in Convocore
* ✅ Access to the Convocore SIP server (provided by Convocore)
## Step 1: Navigate to SIP Trunking
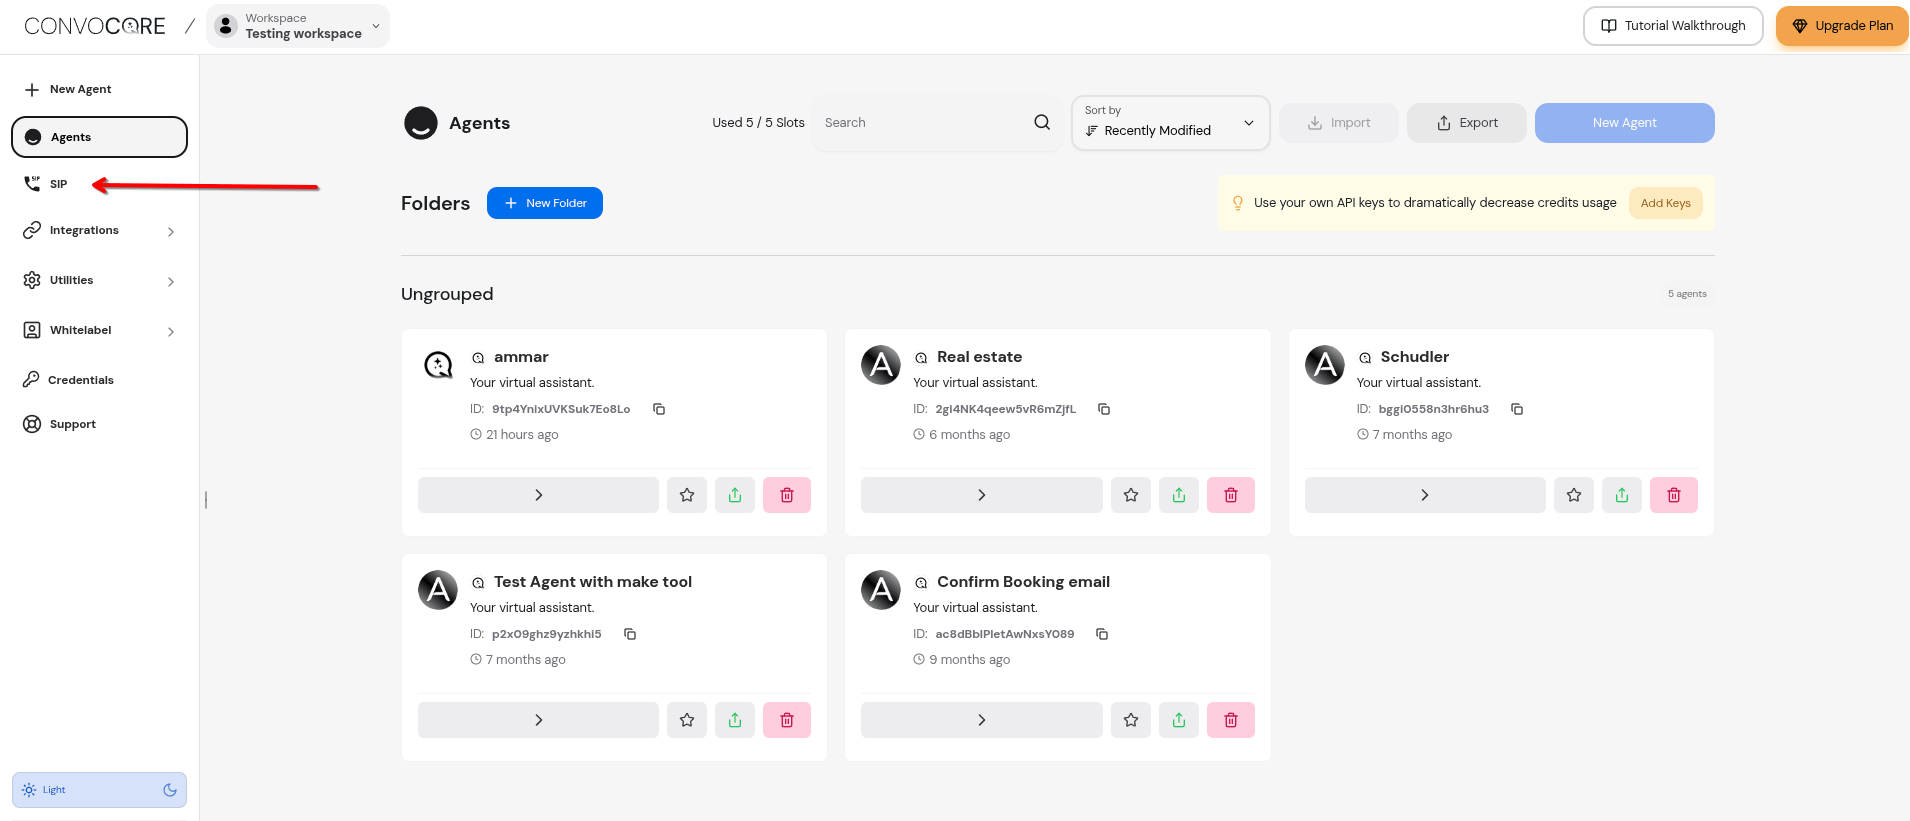
Log into your Convocore dashboard and navigate to the SIP section.
Go to your Convocore workspace dashboard at `https://convocore.ai/app/{region}`
Look for the "SIP" option in the left sidebar navigation menu
Click on the SIP icon to access the SIP trunking management page
 ## Step 2: Add Your SIP Provider
Now you'll configure your SIP trunk by adding your provider's details.
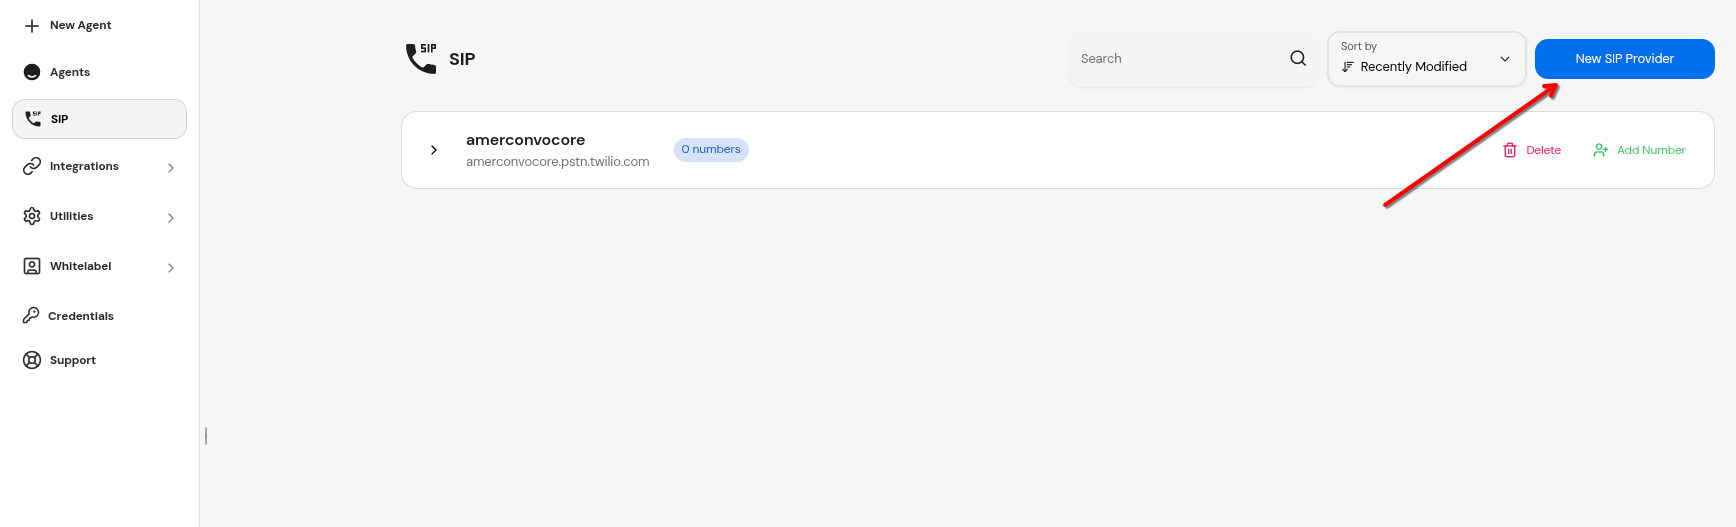
On the SIP management page, click the **"+ New SIP Provider"** button in the top right
## Step 2: Add Your SIP Provider
Now you'll configure your SIP trunk by adding your provider's details.
On the SIP management page, click the **"+ New SIP Provider"** button in the top right
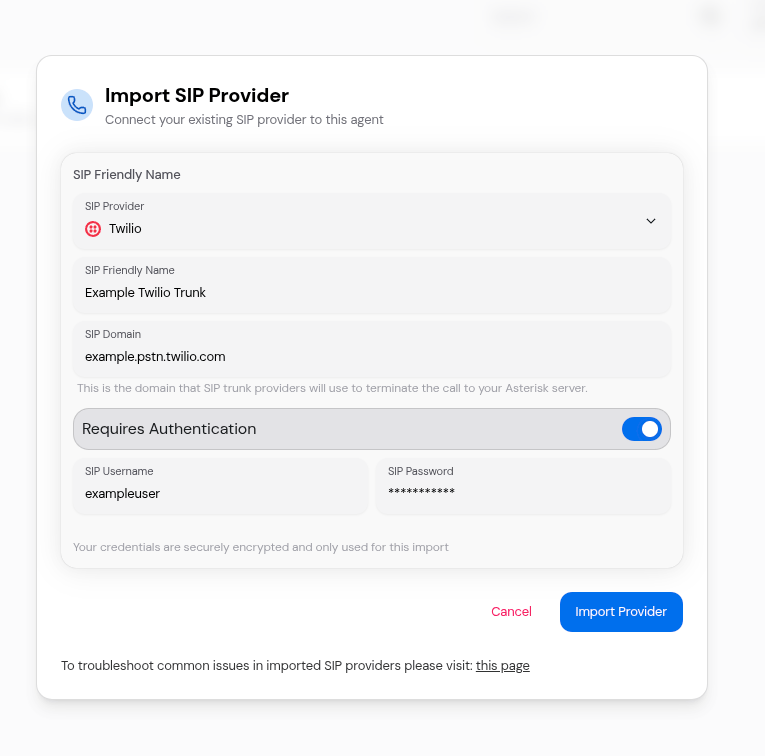
 Fill in your SIP provider information:
* **Friendly Name**: A descriptive name for your trunk (e.g., "Main Office Line")
* **SIP Domain**: Your SIP provider's domain (e.g., `sip.yourprovider.com`)
* **Requires Authentication**: Toggle ON if your provider requires credentials
* **SIP Username**: Your SIP account username (if authentication is enabled)
* **SIP Password**: Your SIP account password (if authentication is enabled)
Click **"Import Provider"** to save your SIP trunk configuration
Fill in your SIP provider information:
* **Friendly Name**: A descriptive name for your trunk (e.g., "Main Office Line")
* **SIP Domain**: Your SIP provider's domain (e.g., `sip.yourprovider.com`)
* **Requires Authentication**: Toggle ON if your provider requires credentials
* **SIP Username**: Your SIP account username (if authentication is enabled)
* **SIP Password**: Your SIP account password (if authentication is enabled)
Click **"Import Provider"** to save your SIP trunk configuration
 ### Example Configuration
Here's a sample configuration for a typical SIP provider:
```
Friendly Name: Production Hotline
SIP Domain: sip.example.com
Requires Authentication: ✓ Enabled
SIP Username: mycompany_user
SIP Password: ••••••••••••
```
Your SIP credentials are securely encrypted and stored. They are only used to authenticate with your SIP provider.
## Step 3: Add a Phone Number
Once your SIP provider is configured, you can add phone numbers and map them to AI agents.
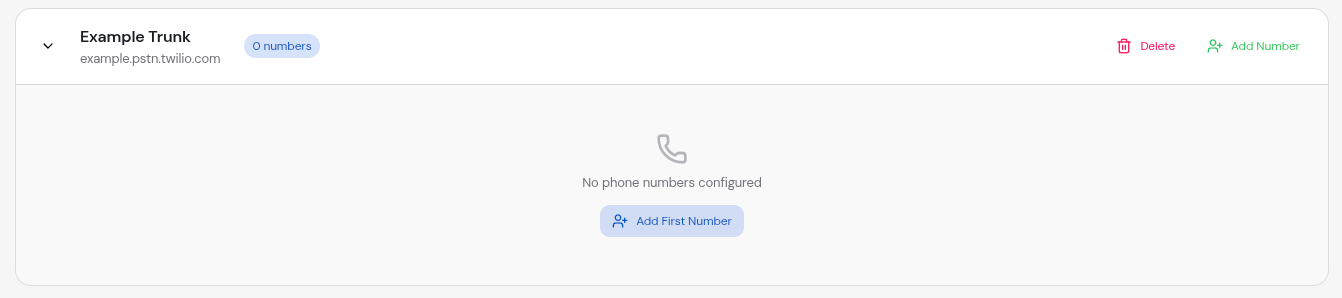
Find the SIP provider you just created in the list
Click the **"Add Number"** button next to your SIP provider
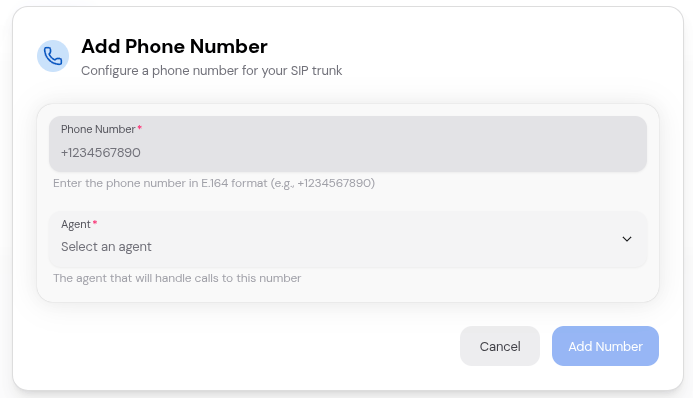
Fill in the phone number details:
* **Phone Number**: Enter in E.164 format (e.g., `+15551234567`)
* **Agent**: Select the AI agent that will handle calls to this number
Click **"Add Number"** to save the configuration
### Example Configuration
Here's a sample configuration for a typical SIP provider:
```
Friendly Name: Production Hotline
SIP Domain: sip.example.com
Requires Authentication: ✓ Enabled
SIP Username: mycompany_user
SIP Password: ••••••••••••
```
Your SIP credentials are securely encrypted and stored. They are only used to authenticate with your SIP provider.
## Step 3: Add a Phone Number
Once your SIP provider is configured, you can add phone numbers and map them to AI agents.
Find the SIP provider you just created in the list
Click the **"Add Number"** button next to your SIP provider
Fill in the phone number details:
* **Phone Number**: Enter in E.164 format (e.g., `+15551234567`)
* **Agent**: Select the AI agent that will handle calls to this number
Click **"Add Number"** to save the configuration
 ### Phone Number Format
Always use E.164 format for phone numbers:
* ✅ **Correct**: `+15551234567` (US)
* ✅ **Correct**: `+442071234567` (UK)
* ✅ **Correct**: `+61212345678` (Australia)
* ❌ **Incorrect**: `555-123-4567`
* ❌ **Incorrect**: `(555) 123-4567`
* ❌ **Incorrect**: `5551234567` (missing country code)
## Step 4: Configure Your SIP Provider
Now you need to configure your SIP provider to route calls to Convocore's SIP server.
### Convocore SIP Server Details
Point your SIP provider to route calls to:
```
IP Address: 134.209.121.168
Port: 5060
Protocol: UDP
```
### Configuration Example (Twilio or Peoplefone)
If you're using Twilio, here's how to configure trunk forwarding:
Go to the Twilio Console at [https://console.twilio.com](https://console.twilio.com)
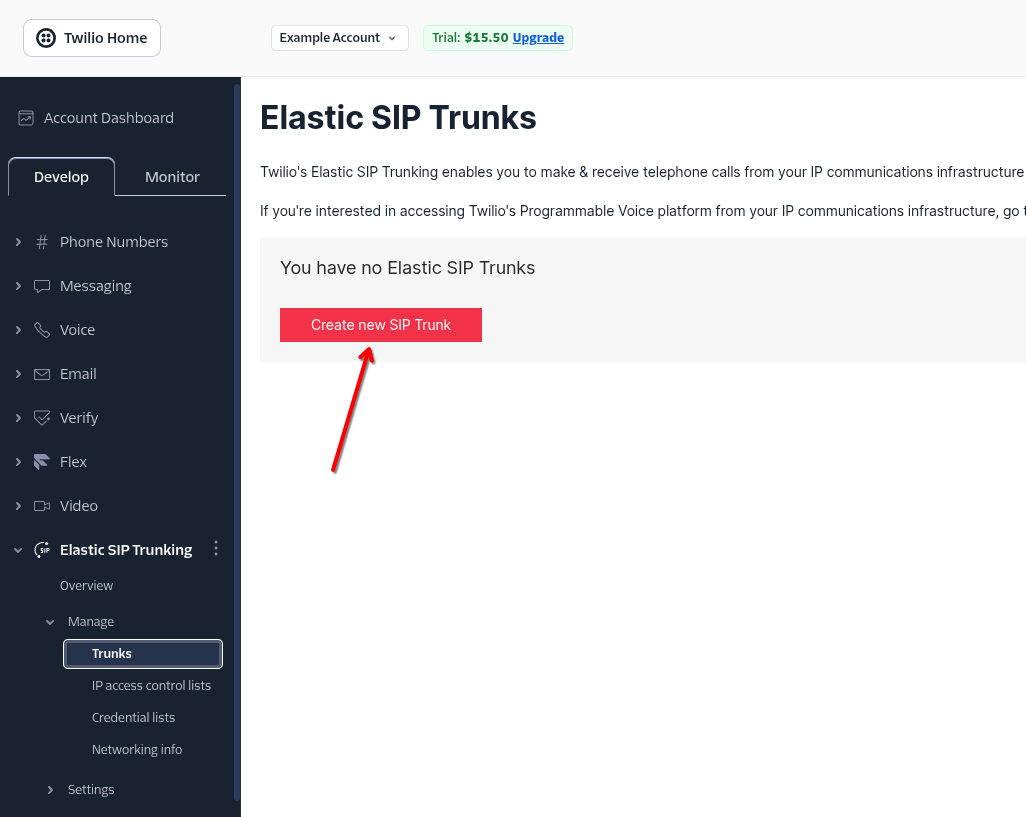
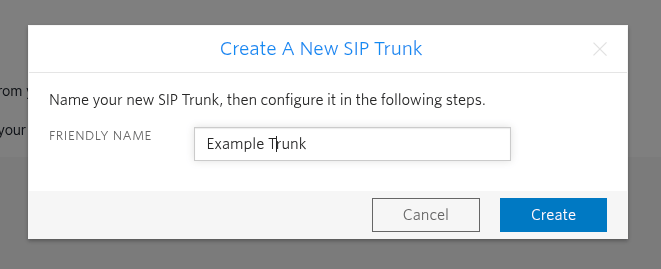
Navigate to **Elastic SIP Trunking** → **Trunks** → **Create new SIP Trunk**
### Phone Number Format
Always use E.164 format for phone numbers:
* ✅ **Correct**: `+15551234567` (US)
* ✅ **Correct**: `+442071234567` (UK)
* ✅ **Correct**: `+61212345678` (Australia)
* ❌ **Incorrect**: `555-123-4567`
* ❌ **Incorrect**: `(555) 123-4567`
* ❌ **Incorrect**: `5551234567` (missing country code)
## Step 4: Configure Your SIP Provider
Now you need to configure your SIP provider to route calls to Convocore's SIP server.
### Convocore SIP Server Details
Point your SIP provider to route calls to:
```
IP Address: 134.209.121.168
Port: 5060
Protocol: UDP
```
### Configuration Example (Twilio or Peoplefone)
If you're using Twilio, here's how to configure trunk forwarding:
Go to the Twilio Console at [https://console.twilio.com](https://console.twilio.com)
Navigate to **Elastic SIP Trunking** → **Trunks** → **Create new SIP Trunk**
 Configure the termination URI as this will be used to route calls to the Convocore SIP server:
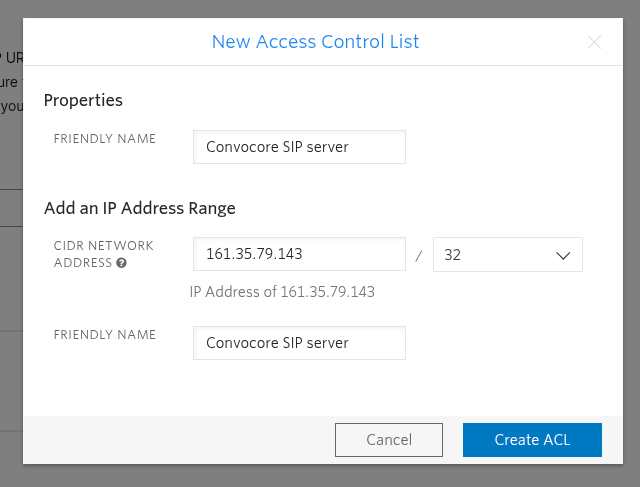
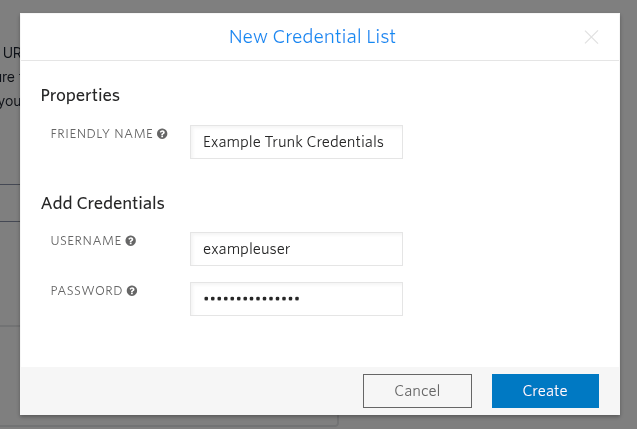
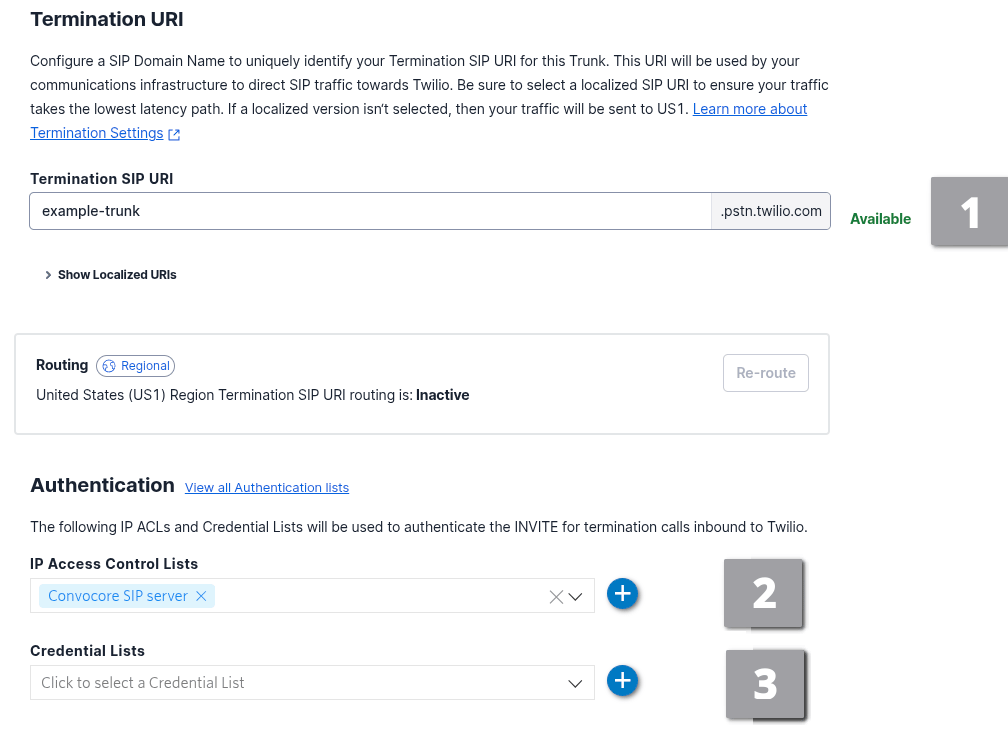 Also configure the ACL configuration and credentials configuration:
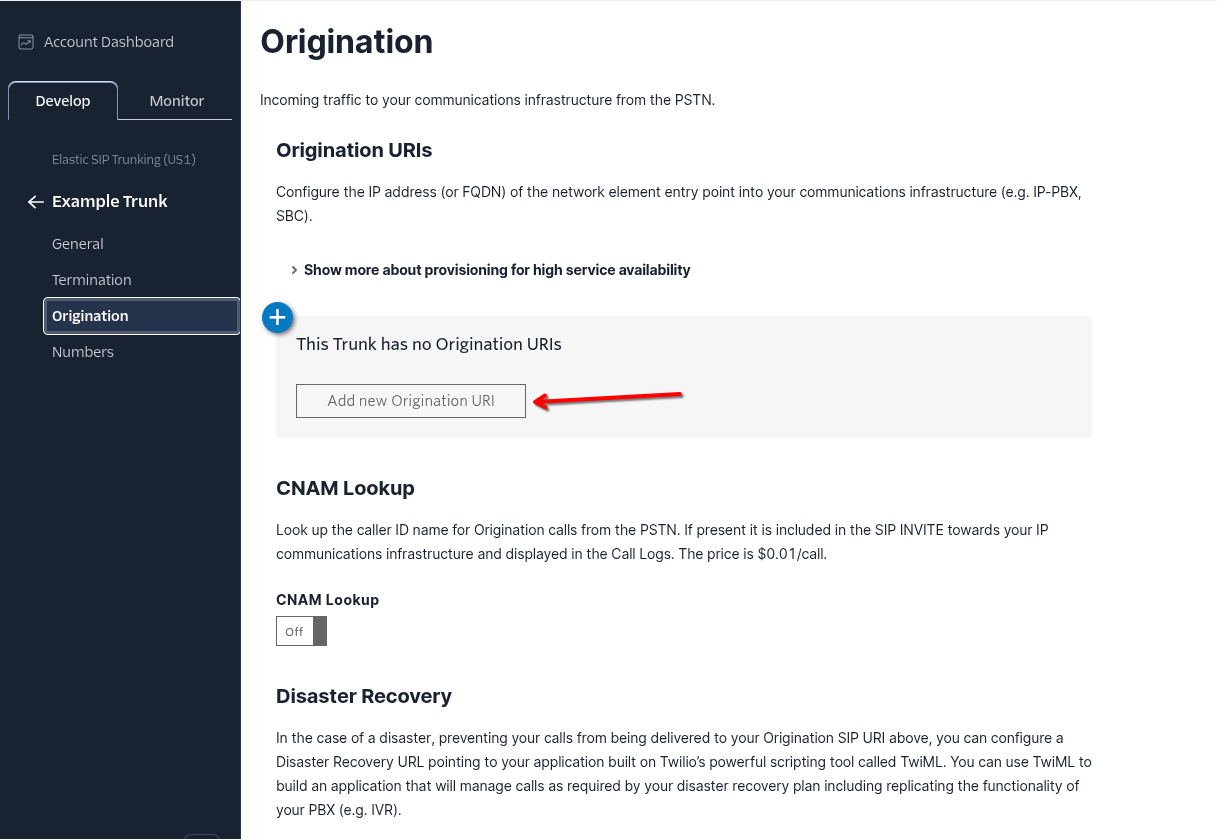
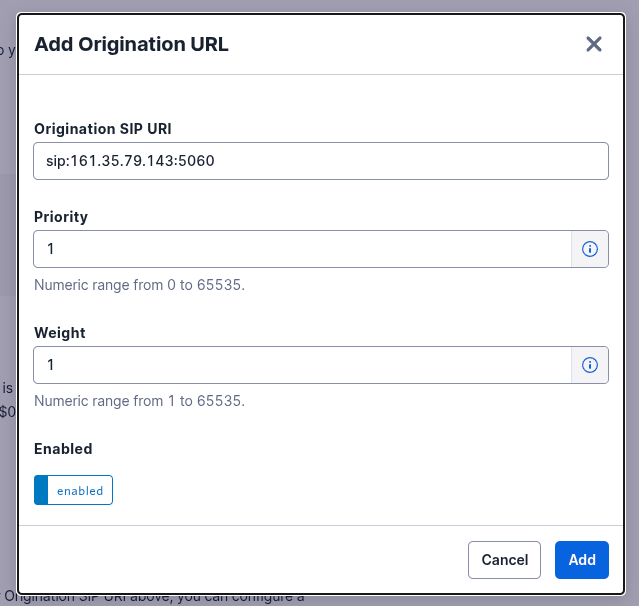
 Add the Convocore SIP server as an origination URI:
```
sip:134.209.121.168:5060
```
Add the Convocore SIP server as an origination URI:
```
sip:134.209.121.168:5060
```
 Associate your phone numbers with this trunk
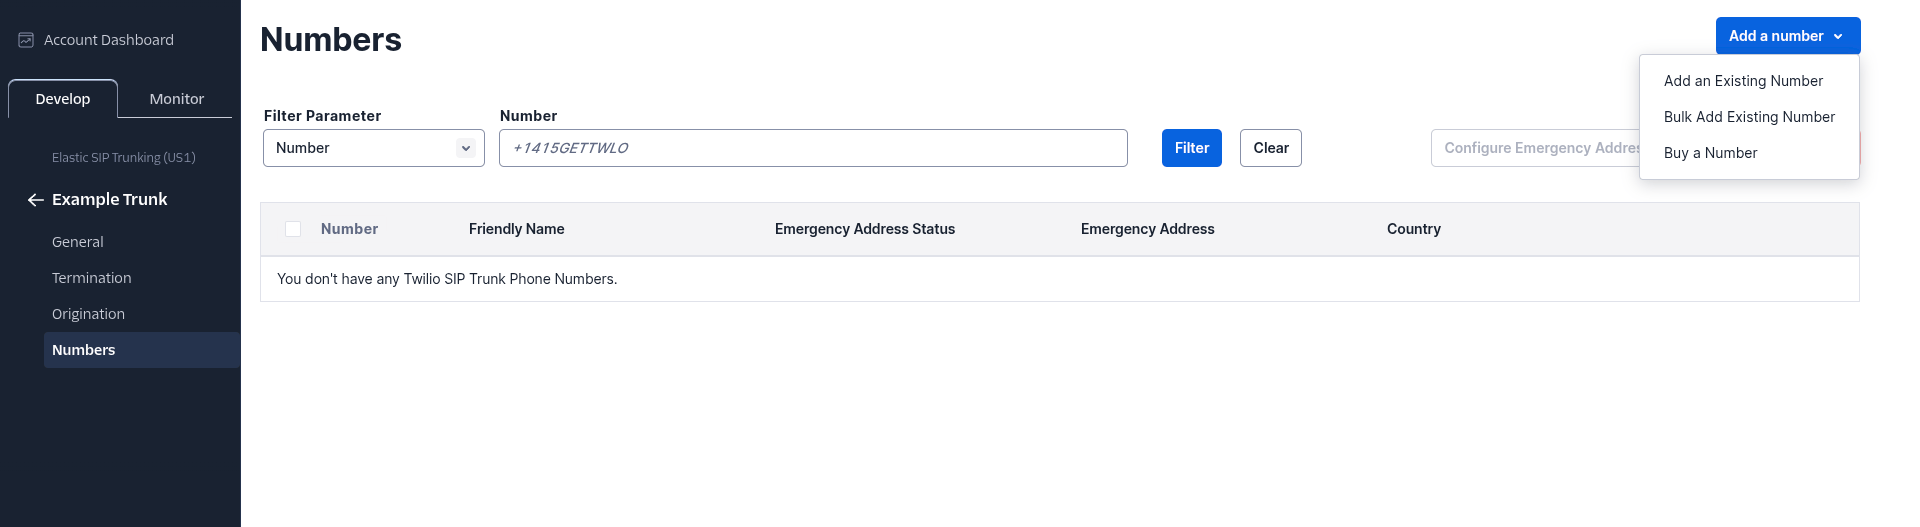 The exact configuration steps vary by provider. Check your SIP provider's documentation for specific instructions on routing calls to an external SIP endpoint.
## Step 5: Test Your Connection
Time to make your first test call!
Double-check that your SIP provider, phone number, and agent are all configured correctly
Dial the phone number you configured from any phone
Your Convocore AI agent should answer and begin the conversation
After the call, check your Convocore dashboard under **Conversations** to see the call transcript
### Troubleshooting Connection Issues
If your test call doesn't work, check these common issues:
* Verify your SIP domain is correct
* Check that your SIP provider is routing to the correct Asterisk server
* Ensure your phone number is in E.164 format
* Check your SIP provider's codec settings (should support PCMU/PCMA)
* Verify firewall rules allow SIP traffic (UDP 5060) and RTP traffic (UDP 10000-20000)
* Ensure NAT traversal is configured if your Asterisk server is behind NAT
* Double-check your SIP username and password
* Verify the "Requires Authentication" toggle is set correctly
* Check if your SIP provider requires IP whitelisting
* Ensure your agent is voice-enabled
* Check that the agent is assigned to the correct phone number
* Verify the region setting matches your deployment
## Step 6: Monitor and Manage
Your SIP trunk is now live! Here's how to monitor and manage it:
### View Active Phone Numbers
On the SIP management page, you can:
* See all configured SIP providers
* Expand each provider to view associated phone numbers
* See which agent is assigned to each number
* View call counts and statistics
The exact configuration steps vary by provider. Check your SIP provider's documentation for specific instructions on routing calls to an external SIP endpoint.
## Step 5: Test Your Connection
Time to make your first test call!
Double-check that your SIP provider, phone number, and agent are all configured correctly
Dial the phone number you configured from any phone
Your Convocore AI agent should answer and begin the conversation
After the call, check your Convocore dashboard under **Conversations** to see the call transcript
### Troubleshooting Connection Issues
If your test call doesn't work, check these common issues:
* Verify your SIP domain is correct
* Check that your SIP provider is routing to the correct Asterisk server
* Ensure your phone number is in E.164 format
* Check your SIP provider's codec settings (should support PCMU/PCMA)
* Verify firewall rules allow SIP traffic (UDP 5060) and RTP traffic (UDP 10000-20000)
* Ensure NAT traversal is configured if your Asterisk server is behind NAT
* Double-check your SIP username and password
* Verify the "Requires Authentication" toggle is set correctly
* Check if your SIP provider requires IP whitelisting
* Ensure your agent is voice-enabled
* Check that the agent is assigned to the correct phone number
* Verify the region setting matches your deployment
## Step 6: Monitor and Manage
Your SIP trunk is now live! Here's how to monitor and manage it:
### View Active Phone Numbers
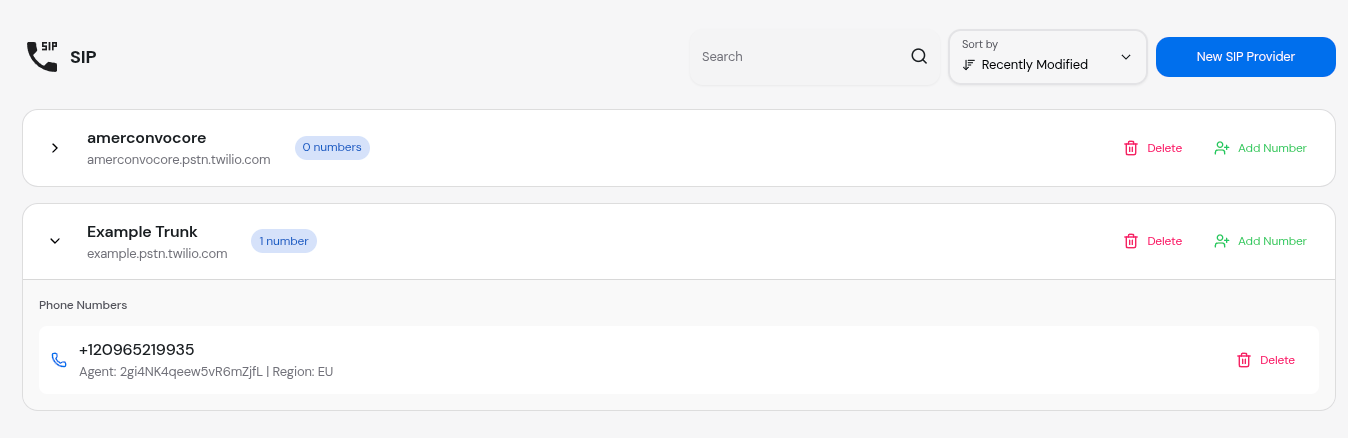
On the SIP management page, you can:
* See all configured SIP providers
* Expand each provider to view associated phone numbers
* See which agent is assigned to each number
* View call counts and statistics
 ### Managing Your Trunk
Click "Add Number" on any provider to configure additional phone numbers
Click the delete button next to any phone number to remove it
Update your SIP provider settings as needed (currently limited)
Remove an entire SIP provider (deletes all associated numbers)
## What's Next?
Now that you have a working SIP trunk, explore these advanced features:
Learn how to manage multiple phone numbers and route them to different agents
Track call metrics, duration, and agent performance
## Common Questions
On **v2-2026**: **2** on Business, **3** on White Label, **5** on White Label Elite. Extra Twilio number slots are \$3/mo. Voice / SIP starts on Business (or the Voice / SIP add-ons).
Yes! You can add multiple SIP providers to your workspace and manage them all from the same interface.
If your SIP provider experiences downtime, calls to your phone numbers will fail at the provider level before reaching Convocore. Consider setting up failover with your provider.
Yes, you can delete and re-add the phone number with a different agent, or use the edit function if available.
Yes — Convocore limits concurrent calls by plan (**3** Business, **10** White Label, **25** Elite; extra lines \$5/mo), and your SIP provider may have its own cap.
**Pro Tip**: Set up multiple phone numbers with different agents to A/B test agent configurations and find what works best for your use case!
## Need Help?
If you encounter any issues during setup:
* 💬 Join our [Discord Community](https://discord.gg/XrJtBsQQRN)
* 📧 Email support at [support@convocore.ai](mailto:support@convocore.ai)
### Managing Your Trunk
Click "Add Number" on any provider to configure additional phone numbers
Click the delete button next to any phone number to remove it
Update your SIP provider settings as needed (currently limited)
Remove an entire SIP provider (deletes all associated numbers)
## What's Next?
Now that you have a working SIP trunk, explore these advanced features:
Learn how to manage multiple phone numbers and route them to different agents
Track call metrics, duration, and agent performance
## Common Questions
On **v2-2026**: **2** on Business, **3** on White Label, **5** on White Label Elite. Extra Twilio number slots are \$3/mo. Voice / SIP starts on Business (or the Voice / SIP add-ons).
Yes! You can add multiple SIP providers to your workspace and manage them all from the same interface.
If your SIP provider experiences downtime, calls to your phone numbers will fail at the provider level before reaching Convocore. Consider setting up failover with your provider.
Yes, you can delete and re-add the phone number with a different agent, or use the edit function if available.
Yes — Convocore limits concurrent calls by plan (**3** Business, **10** White Label, **25** Elite; extra lines \$5/mo), and your SIP provider may have its own cap.
**Pro Tip**: Set up multiple phone numbers with different agents to A/B test agent configurations and find what works best for your use case!
## Need Help?
If you encounter any issues during setup:
* 💬 Join our [Discord Community](https://discord.gg/XrJtBsQQRN)
* 📧 Email support at [support@convocore.ai](mailto:support@convocore.ai)